Timeline Slider
jQuery Plugin
- Created: 21/4/2012
- Current version: v.1.0 - 21/4/2012
- Author: pezflash
- http://codecanyon.net/user/pezflash
Thank you for purchasing this file. If you have any questions that are beyond the scope of this help file, please contact me through my Envato profile page.
INTRODUCTION
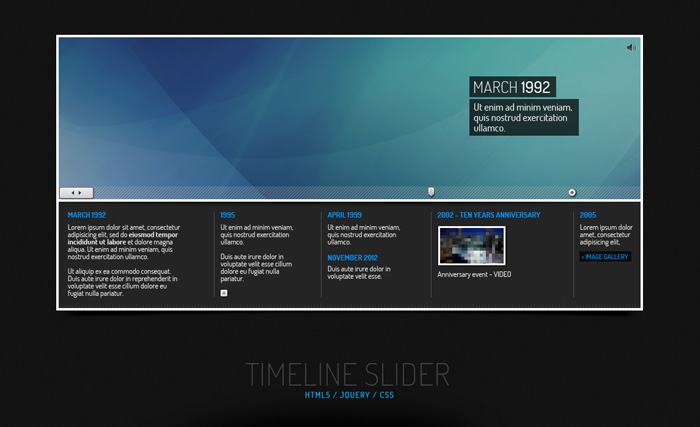
Timeline Slider is the definitive plugin to build your history timelines. Its main configuration can be
easily customized due to its compact config parameters, directly from the html file. Also more configurations
can be edited through the css style sheet file. It comes with 2 skins, Dark, Light, to make easy the integration
on your web project. The powerful jQuery library makes this component cross-platform.
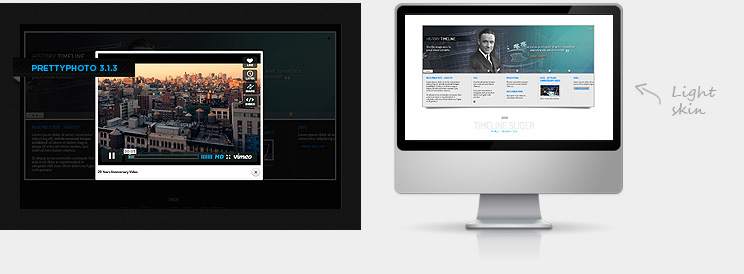
Useful fullscreen Lightbox [Prettyphoto]
The script includes the prettyPhoto add-on, which allows multiple possibilities.Check the provided samples to get an idea of possible usages, such multigallery with unlimited items, videos (Quicktime, Flv,
Youtube, Vimeo). For more info check the reference sections.
HTML Structure
This jQuery plugin is structured in an quick format to make easier the installation in other projects.
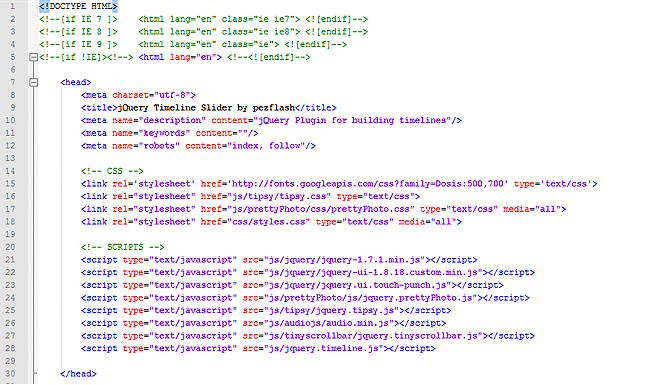
Inside the < head > you must reference the required classes: "jquery-1.7.1min.js", "jquery-ui-1.8.18.custom.min.js",
"jquery.ui.touch-punch.js", "jquery.prettyPhoto.js", "jquery.tipsy.js", "audio.min.js", "jquery.tinyscrollbar.js,
"
"jquery.timeline.js", apart from the required CSS files for PrettyPhoto, Tipsy and the main style sheet (css/styles.css)
[TIP]: How to change the main font
The template uses Google Fonts system. This means you don't need to manage your own font files, all fonts will be read
from Google server. Just refer inside the < head > tag your desired font (default is: Dosis) and then go to styles.css file
and replace "dosis" string for your font ID. For more info and fonts check the following URL:
https://developers.google.com/webfonts/
Inside the body, there is DIV with the .container reference. This should be your destination DIV inside your project.
So, to paste inside your project, you would just need to copy/paste the whole < div class="timeline_container" >,
and if you want to keep it, also the preload div, right before it.
 THE MAIN CONFIG SETTINGS DIV
These are the core configuration settings of the plugin. "fadeInDelay" refers to the time delay
that the full timeline will appear on screen. Default is set to 3000 (3 seconds, in milliseconds) so it gives some time
to at least first image loads. "width" and "height" refers to the main box size. Note that the current style includes a
4px border on all sides, so, to match the 960px width of the sample, width is set to 952 (960 - 4x2).
"imagesWidth" refers to the images band width. You will need to calculate this value once you have all your images ready.
For testing purposes, you can just setup a high value, until you finish the design of the band. "imagesHeight" is the height
of that images row. Note that scrollbar will appear over it. "contentWidth" is the width of the bottom text row, and same as
images, you will need to calculate it once you have all your contents inside the html. "contentHeight" refers to this area height.
The dragger width and height must be setup in order to the script which control scrolling works. Also "draggerHeight" value will
to the full scroll area size. "mouseWheel" is one useful parameter to activate/deactivate the mose wheel functionality over the plugin.
data-width="952" > data-height="450" > data-imagesWidth="3400" > data-imagesHeight="265" > data-contentWidth="1670" > data-contentHeight="174" > data-draggerWidth="59" > data-draggerHeight="21" > data-mouseWheel="1" > ...
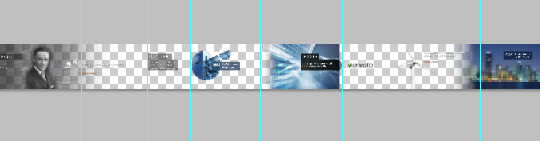
The following DIV displays the Images that will appear on top band. You can use jpg/gif/png and any width
but they should be matching your "imagesHeight" value setup on the previous config div. The sample provided uses transparent PNG images,
which is a nice way to create kind of deep effect over the background while scrolling. Be creative! (note that you can also place html
content here, even complex elements as video players, just place it in the right place and create your custom css for them.


...
The following DIV displays the small marks that appears on the scroll area.
Each entry < div > has an id+number (MUST be correlative), the _x position, considering 0 the left side of the timeline container,
and the label that will be displayed on rollover. You can use plain number or more elaborate labels
The following DIV displays all the Milestones text items.
This is maybe the most tricky part of the code. Content is organized by columns. You will need to setup your first column as the
sample provided, with the class "column_first", so it will skip the vertical line that appears on the rest. Each column content can
be edited up to your needs, considering your available height in content area. You can use the prettyPhoto plugin for extended content
using hidden divs (please, refer to the provided samples to see how it works). Almost any kind of media can be displayed inside the
columns, so be creative!. One important thing is the width of each column. You will find kind of short codes using the different width
classes which refers as "c100", "c125", "c150", "c200" and so on, where the number refers to the value in pixels. You have built-in
classes from 100px to 400px. For more values you will need to add them in the style.css file.
(note: any thumb or link tagged with "video_rollover" class, will automatically pause the global music)
NOVEMBER 1978 - STARTUP Lorem ipsum dolor sit amet, consectetur adipisicing elit, sed do eiusmod tempor incididunt ut labore et dolore magna aliqua. Ut enim ad minim veniam, quis nostrud exercitation ullamco.
Ut aliquip ex ea commodo consequat. Duis aute irure dolor in reprehenderit in voluptate velit esse cillum dolore eu fugiat nulla pariatur.1985 Ut enim ad minim veniam, quis nostrud exercitation ullamco.
Duis aute irure dolor in voluptate velit esse cillum dolore eu fugiat nulla pariatur.
Sample of extended content opened with lightbox
Lorem ipsum dolor sit amet, consectetur adipisicing elit, sed do eiusmod tempor incididunt ut labore et dolore magna aliqua. Ut enim ad minim veniam, quis nostrud exercitation ullamco laboris nisi ut aliquip sample of external link. Duis aute irure dolor in reprehenderit in voluptate velit esse cillum dolore eu fugiat nulla pariatur. Excepteur sint occaecat cupidatat non proident, sunt in culpa qui officia deserunt mollit anim id est laborum.
This is the div that contains the music file reference for the built-in HTML5 audio player. For more info about supported formats
& browsers, please check this url: http://kolber.github.com/audiojs/
Note: Remove the whole div if you don't want music on your timeline.
JavaScript
This plugin imports 5 Javascript files.
- jquery-1.7.1.min.js
- jquery-ui-1.8.18.custom.min.js
- jquery.ui.touch-punch.js (Drag functionality for tablets/Mobiles)
- jquery.prettyPhoto.js (Lightbox)
- jquery.tipsy.js (Tooltip)
- audio.min.js (HTML5 Audio player)
- jquery.tinyscrollbar.js (Core scrolling functionality)
- jquery.timeline.js
Except the jquery.timeline.js file, the rest of classes copyrights belongs to their respective authors.
Please, check each class license and terms conditions on the author websites (check on Sources & Credits for more info)
Also, note that on some of those JS files, some changes and additions have been added.
Let's explain it a bit...
Inside the jquery.timeline.js you will find all the functions that controls the work around of the plugin. Each function is
properly commented in the .js file. The whole js is properly formatted as a jQuery plugin, to avoid conflicts with other frameworks.
Note: editing the jquery plugin code requires some knowledge of javascript and jQuery coding; do not change
the .js file unless you know what you are doing. In most of the cases, the html accesible data will be enough
to customize the plugin to match your project needs.Inside the JS file you will find some references regarding the main functionality of the plugin. Basically, it's structured
on 4 main sections:
1. Global settings and variables (remember that these vars retrieves the data from html contents)
$.myTimeline = function() { ... }
2. Configuration of third party addons
audiojs.events.ready(function() { ... // scripts for audio player } $("a[rel^='prettyPhoto']").prettyPhoto({social_tools:false}); ... // scripts for prettyphoto readBt.tipsy({ gravity: 'w', fade: true, offset: 5 }); ... // scripts for tooltip.
3. Thumbnail rollOver configuration
imgRoll.hover(function(){ // Image thumbs rollover icon vidRoll.hover(function(){ // Video thumbs rollover icon vidRoll.click(function(){ // Video thumbs controlling global audio
4. Dragging and Scrolling scripts
startDrag(images); // Apply main drag function to whole images band for ( var i = 0; i < marksAmount; i++ ) { // for function to create scrollbar marks tl.tinyscrollbar({ // Apply main scrolling script to draggerCSS
Apart from the main configuration parameters of the timeline script, you can also modify some aspects of the overall design
by modifying the css/styles.css file. Note that in the 2 provided samples, some aspects have been modified, as border color,
background, milestones text color, etc.The css includes one css reference for the body object and the .container as well. Both are required for the samples,
but in most the cases you will just want to remove them. Remember that the "container" DIV is just for demo purpouses
to place the entire timeline gallery centered on screen. The container DIV would be replaced with your own target DIV.
[TIP] How to add the default font (Dosis)
/* -- Add the font attribute on your body element, to apply the google fonts API reference -- */ body { background: #fff; font: 13px 'Dosis', sans-serif; }.timeline_container is the main holder for the whole timeline.
.timeline .viewport references are linked with the main holder for top images band.
.timeline .milestones references are linked with the main holder for bottom milestones content.
/* -- Edit the global background and border color in the following css -- */ #timeline_container { position:relative; background-color:#e9e9e9; border:4px solid #bbb; opacity: 0; } /* -- Edit your images area background in the following css -- */ #timeline .viewport { overflow: hidden; position: relative; background: url(../images/background.jpg) no-repeat 0 0; } /* -- Edit the divider border color in the following css -- */ #timeline .milestones { overflow: hidden; position: relative; border-top: 4px solid #bbb; }Other useful entries in the CSS, are the following:
/* -- Css that controls the milestones columns main attributes -- */ #timeline .column { float: left; padding: 0px 0px 0px 10px; margin: 14px 0px 0px 50px; height: 150px; border-left: 1px solid #ccc; } /* -- Css that controls the milestones columns width -- */ /* -- Create new ones if needed -- */ #timeline .c100 { width: 100px; } #timeline .c125 { width: 125px; } #timeline .c150 { width: 150px; } #timeline .c175 { width: 175px; } #timeline .c200 { width: 200px; } /* -- Css that controls the milestones text format -- */ #timeline .txt { font-size: 12px; font-weight: 500; line-height: 12px; color: #565656; margin: 8px 0px 0px 0px; }The CSS that controls the styling for the scrollbar area, are the following:
/* -- Change the PNG images for styling your own scrollbars -- */ #timeline .scrollbar{ background: transparent url(../images/scrollbar_background.png) repeat-x 0 0; position: absolute; } #timeline .dragger { ... #timeline .mark { ...If you would like to edit a specific section of the plugin, simply find the appropriate label in the CSS file, and
then scroll down until you find the appropriate style that needs to be edited.PSD Files
This file includes several psds with the main design elements of the plugin. All are full layered and can
be easily edited to generate your own themes / skins. If you create a nice new theme and want to share it,
i'll be glad to heard about you! ;)
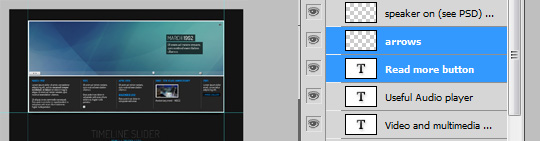
The PSD files are located inside /Psds folder in the original source pack.
Useful Links
If you need some basic help on Javascript, or the integrated LightBox plugins, please, check the urls provided on the next section
Soucres & Credits. In any case, in the following websites you will find useful information and tools to make easier your customization
jQuery Tutorials
- http://www.w3schools.com/js/
- http://javascriptsource.com
- http://webdesignerwall.com/tutorials/jquery-tutorials-for-designers
- http://docs.jquery.com/Tutorials:How_jQuery_Works
- http://acrisdesign.com/2010/05/35-jquery-tutorials-you-must-know/
Useful tools- Notepad++ - Great free source code editor
- Online simple image resizer
- Online Photo editor
Sources and Credits
The file uses some open source files, here are the project / authors urls. Please refer to them in case you
have doubts regarding licenses or copyrights limitations while using this plugin.
- http://www.jquery.com
- http://www.jqueryui.com
- http://touchpunch.furf.com/
- http://www.no-margin-for-errors.com/projects/prettyPhoto/
- http://onehackoranother.com/projects/jquery/tipsy/
- http://kolber.github.com/audiojs/
- http://baijs.nl/tinyscrollbar/
About the images
The online samples images belongs to their respective owners and are only used for demo purpouses.
None of these images are included in this source pack.
Once again, thank you so much for purchasing this plugin.
If you have a more general question relating to this file, dont' hesitate to contact me through my profile form.
